I recently upgraded the GPU in my main computer to the new Intel Arc B580. Instead of retiring my old GPU, I decided to repurpose it to add AI capabilities to my Homelab!
This article walks through the process of integrating my old AMD Vega 56 GPU into my Homelab using an eGPU enclosure, PCIe passthrough, Ollama, and Open WebUI. It covers everything from the hardware setup to virtual machine configuration and software installation needed to create a fully functional local AI environment.
Hardware
My old GPU is a large two-slot card that requires significant space to install properly. Since my Homelab server uses a compact ITX case, there simply wasn't enough physical space to install the card directly inside the case. To overcome this limitation, I decided to use an external GPU (eGPU) solution using an eGPU enclosure purchased from AliExpress. The enclosure uses OCuLink, an external PCIe connector standard that provides up to 4x PCIe 4.0 lanes (approximately 64 Gbps) for connecting high-bandwidth peripherals outside the computer case.
Setting up the enclosure required installing a dedicated power supply unit (PSU) to provide power for the Vega 56, which has a TDP of around 210W. For improved thermal management and to ensure the GPU would remain cool under sustained AI workloads, I also installed two Noctua fans in the enclosure.
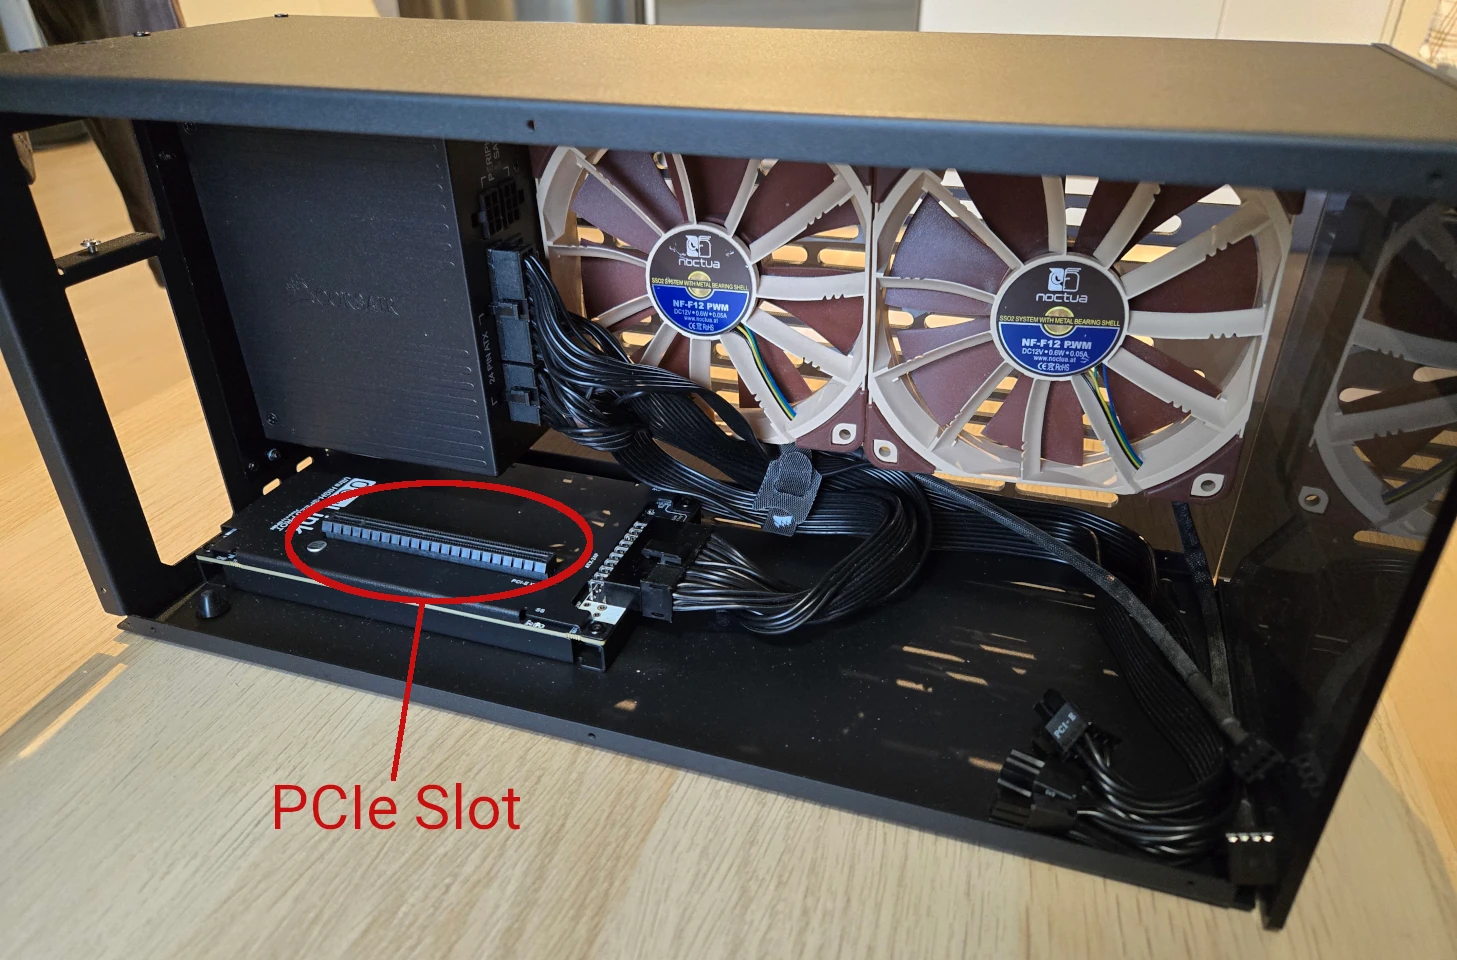
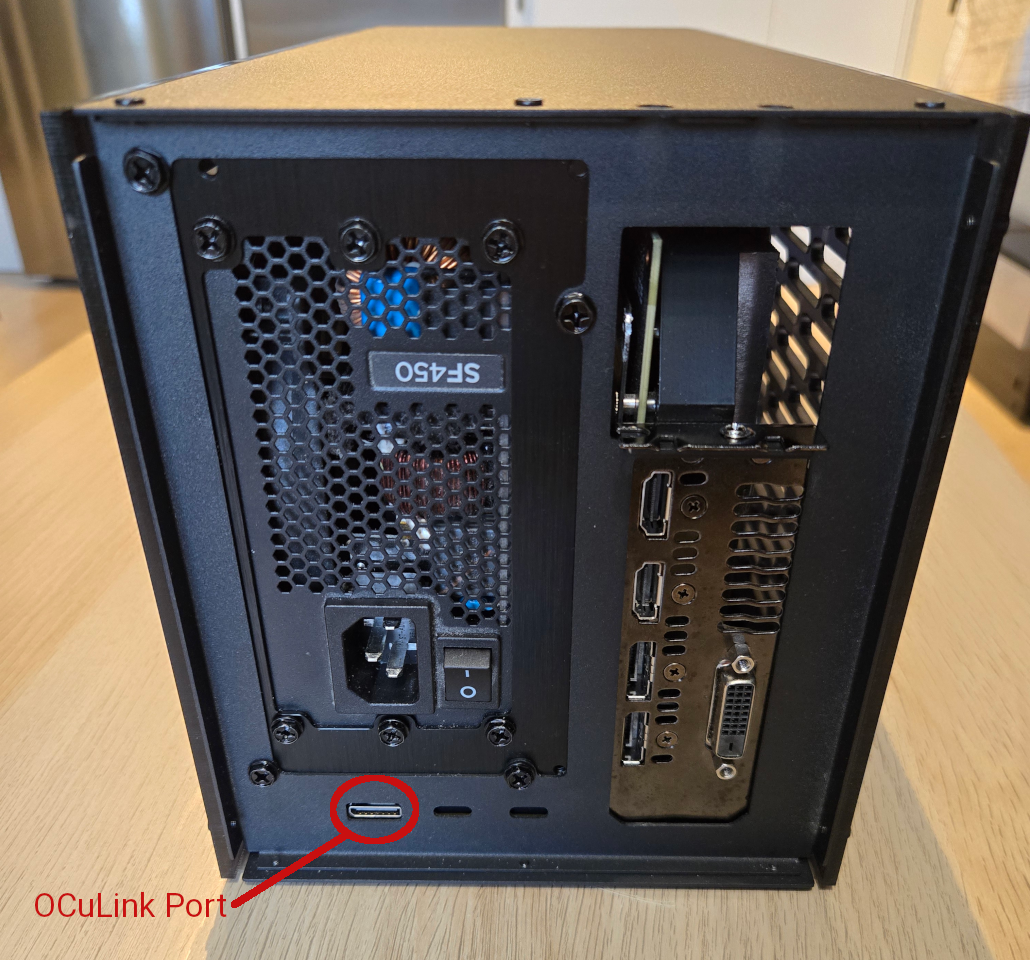
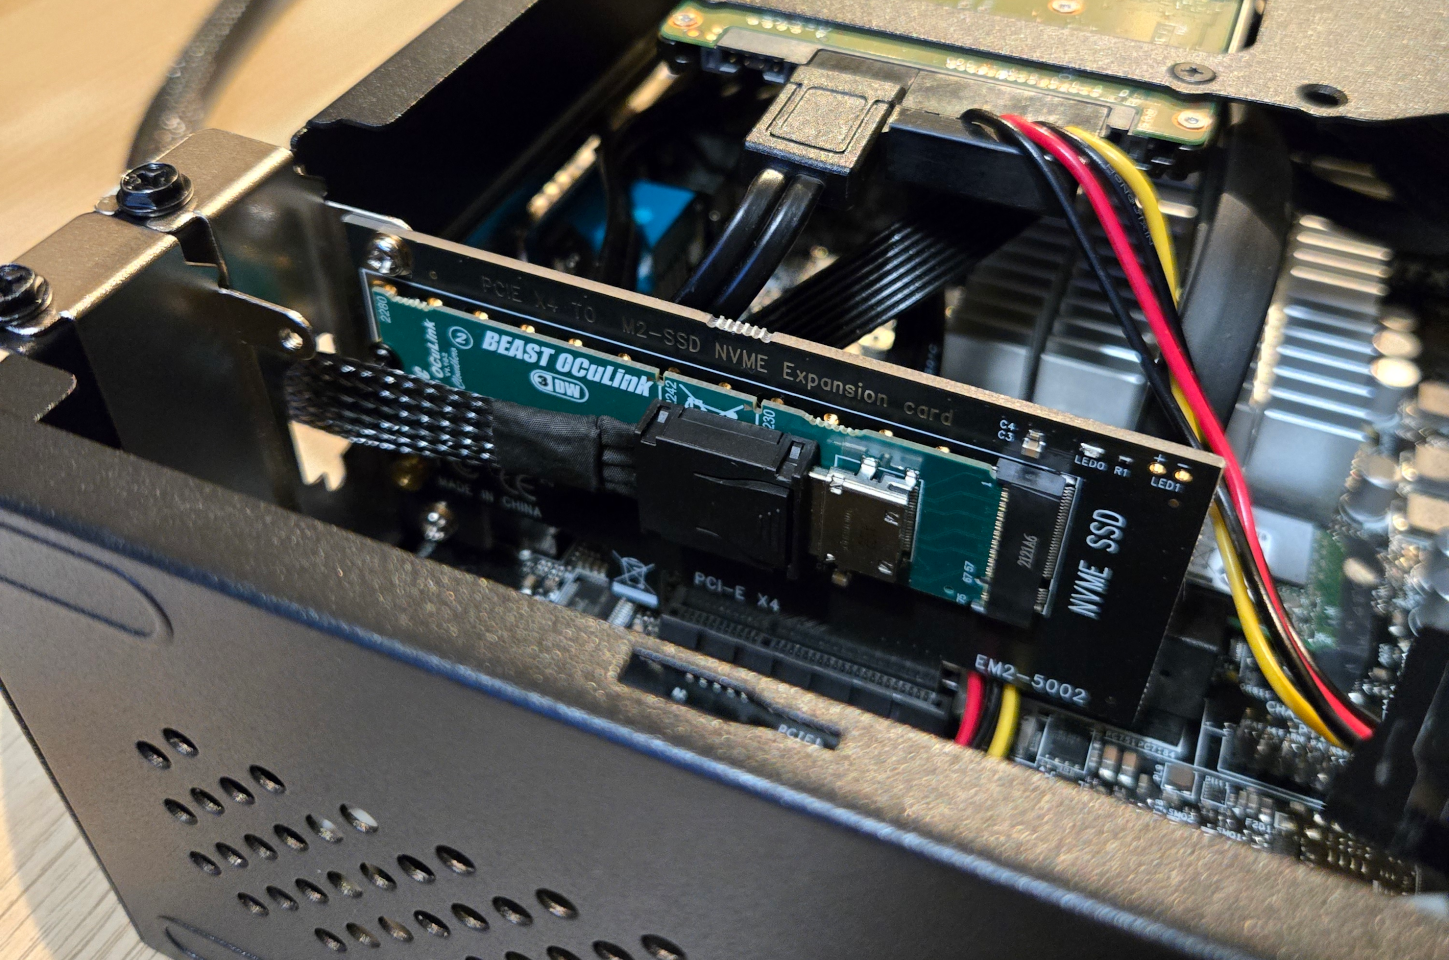
My Homelab server lacked a native OCuLink port, but fortunately the eGPU dock came bundled with an M.2 to OCuLink adapter card. The M.2 slot in my Homelab server was already occupied by an SSD, so I used a PCIe to M.2 adapter card to install it in a spare PCIe slot. To cleanly route the OCuLink cable out of the case, I repurposed a spare DB-9 shield I had in my parts collection.

Software
My Homelab is based on a virtualized Kubernetes cluster where each node is a virtual machine running Talos Linux. I therefore had to set up PCIe passthrough so that I could pass the GPU to one of the virtual machines. I also had to install the right drivers and make Kubernetes aware of the GPU so it could assign it to pods. All in all, five different steps were required to get up and running:
- Preventing the Proxmox host from using the GPU by binding it to the VFIO-PCI driver
- Installing the vendor-reset kernel module to address the AMD reset bug that affects Vega GPUs
- Passing the GPU through to a Talos Linux virtual machine in my Kubernetes cluster
- Installing the ROCm k8s-device-plugin to make the GPU available to containers
- Deploying Ollama and Open WebUI as containerized applications to run and interact with AI models
Preventing the host from using the GPU
I use Ansible to manage OS-level configurations on my Proxmox server, which allows me to maintain a consistent, reproducible infrastructure. To prevent the host system from claiming the GPU—which would make it unavailable for passthrough—I created an Ansible playbook that binds the vfio-pci driver to the GPU instead of the default AMD drivers:
This playbook performs two critical tasks. The first task ensures the necessary kernel modules (vfio, vfio_iommu_type1 and vfio_pci) are loaded at boot time by adding them to /etc/modules. These modules are the foundation for PCIe passthrough functionality in the Linux kernel.
The second task creates a configuration file specifically for the vfio-pci driver, explicitly targeting my Vega 56 GPU by its PCIe IDs (1002:687f for the graphics processor and 1002:aaf8 for the integrated audio device). This configuration instructs the system to bind these devices to the VFIO driver at boot time, effectively reserving them for PCIe passthrough and preventing the host system from loading the standard AMD drivers.
Fixing the AMD reset bug
A significant challenge when working with AMD GPUs in virtualized environments is the notorious "reset bug," which particularly affects the Vega and Navi series cards. This bug manifests when a VM with a passed-through AMD GPU is restarted—the GPU can become stuck in an inconsistent state, preventing it from being properly initialized again without a full system reboot.
To address this issue, I installed the vendor-reset kernel module, which implements specialized workarounds for this bug. I automated the process with another Ansible playbook:
This playbook handles the entire process of setting up vendor-reset. It first ensures all necessary dependencies are installed, then clones the vendor-reset repository from GitHub. The module is built and installed using DKMS (Dynamic Kernel Module Support), which ensures it remains properly installed even when the kernel is updated. The playbook also configures the module to load at boot and creates a udev rule that applies the "device_specific" reset method whenever the GPU is detected.
After running the playbook, I verified that vendor-reset was successfully installed by checking its DKMS status:
$ dkms status vendor-reset
vendor-reset/0.1.1, 6.8.12-8-pve, x86_64: installed
This confirmed that the module was properly installed and ready to handle the resetting of the GPU.
Passing the GPU to the Talos virtual machine
With the host system properly configured to avoid claiming the GPU and the reset bug addressed, the next step was to pass the GPU through to one of the virtual machines in my Kubernetes cluster.
Unlike traditional Linux distributions, Talos is API-driven and container-focused, making it ideal for Kubernetes deployments but requiring some special considerations for hardware passthrough. Since my GPU would need to be accessible to containerized AI applications, it needed to be properly integrated with this architecture.
First, I needed to ensure that the Talos image I was using included the necessary AMD GPU drivers. I visited factory.talos.dev to generate a custom Talos image with the required extensions. I added the siderolabs/amdgpu extension, which provides the AMD GPU drivers needed for the Vega 56 GPU to be recognized by Talos.
Next, I updated my Terraform configuration to define which Kubernetes node would receive the GPU passthrough. I added a new parameter called pci_passthrough to my node definitions, assigning the GPU's PCIe ID to the first worker node while leaving this parameter empty for all other nodes:
This configuration ensures that only the first worker node receives the GPU passthrough, preventing conflicts that would occur if multiple VMs attempted to access the same physical GPU. The PCIe ID 0000:03:00 represents my Vega 56 GPU in the host system's PCIe hierarchy; this value would need to be adjusted based on your specific hardware configuration.
To implement the passthrough in the VM configuration, I added a dynamic hostpci block to the virtual machine resource definition:
This dynamic block creates a PCIe passthrough configuration for each device in the pci_passthrough list. In my case, with just one GPU, this creates a single passthrough configuration that maps the physical GPU directly into the VM's environment.
I also had to modify the VM's machine type from the default i440fx to the more modern q35 type, as this change is necessary for proper GPU passthrough functionality:
The q35 machine type provides better support for PCIe devices and enables important virtualization features like IOMMU grouping and PCIe ACS capabilities, which are essential for reliable GPU passthrough.
After applying these changes with Terraform, I used the talosctl command-line tool to verify that the GPU was properly recognized by Talos:
$ talosctl get pcidevices
NODE           NAMESPACE   TYPE        ID             VERSION   CLASS                      SUBCLASS                    VENDOR                                   PRODUCT
...
192.168.0.90   hardware    PCIDevice   0000:00:10.0   1         Display controller         VGA compatible controller   Advanced Micro Devices, Inc. [AMD/ATI]   Vega 10 XL/XT [Radeon RX Vega 56/64]
192.168.0.90   hardware    PCIDevice   0000:00:10.1   1         Multimedia controller      Audio device                Advanced Micro Devices, Inc. [AMD/ATI]   Vega 10 HDMI Audio [Radeon Vega 56/64]
...
This output confirmed that both components of the GPU—the graphics processor and its associated audio device—were successfully detected within the Talos VM.
Installing the ROCm k8s-device-plugin
Although the GPU was now visible to the Talos node at the operating system level, an additional step was necessary before Kubernetes pods could utilize the GPU. Kubernetes requires a device plugin to recognize and allocate GPU resources to containers. For AMD GPUs, this is accomplished using the ROCm k8s-device-plugin.
The ROCm k8s-device-plugin serves as a bridge between Kubernetes and AMD GPUs, allowing the Kubernetes scheduler to keep track of available GPU resources and allocate them to pods that request them. This is essential for running AI workloads efficiently in a containerized environment.
I used a simple kustomization to deploy the ROCm k8s-device-plugin to my cluster:
This configuration deploys the device plugin as a DaemonSet, ensuring it runs on all nodes. The plugin discovers the available GPUs on each node and registers them with the Kubernetes API server, making them available as allocatable resources under the name amd.com/gpu.
After deploying the device plugin, I verified that the GPU was properly registered with Kubernetes by checking the available resources on the node:
$ kubectl describe node talos-worker-d4558db
...
Capacity:
  amd.com/gpu:        1
  cpu:                4
  ephemeral-storage:  64268Mi
  hugepages-2Mi:      0
  memory:             14294352Ki
  pods:               110
Allocatable:
  amd.com/gpu:        1
  cpu:                3950m
  ephemeral-storage:  60382458575
  hugepages-2Mi:      0
  memory:             13667664Ki
  pods:               110
...
This output confirmed that Kubernetes now recognized the AMD GPU as an allocatable resource with the resource type amd.com/gpu. With this configuration, I could now specify GPU resource requirements in pod specifications, and Kubernetes would schedule those pods on nodes with available GPUs.
The device plugin also ensures proper isolation between containers and manages GPU sharing policies, preventing issues that could arise from multiple containers trying to access the same GPU resources simultaneously.
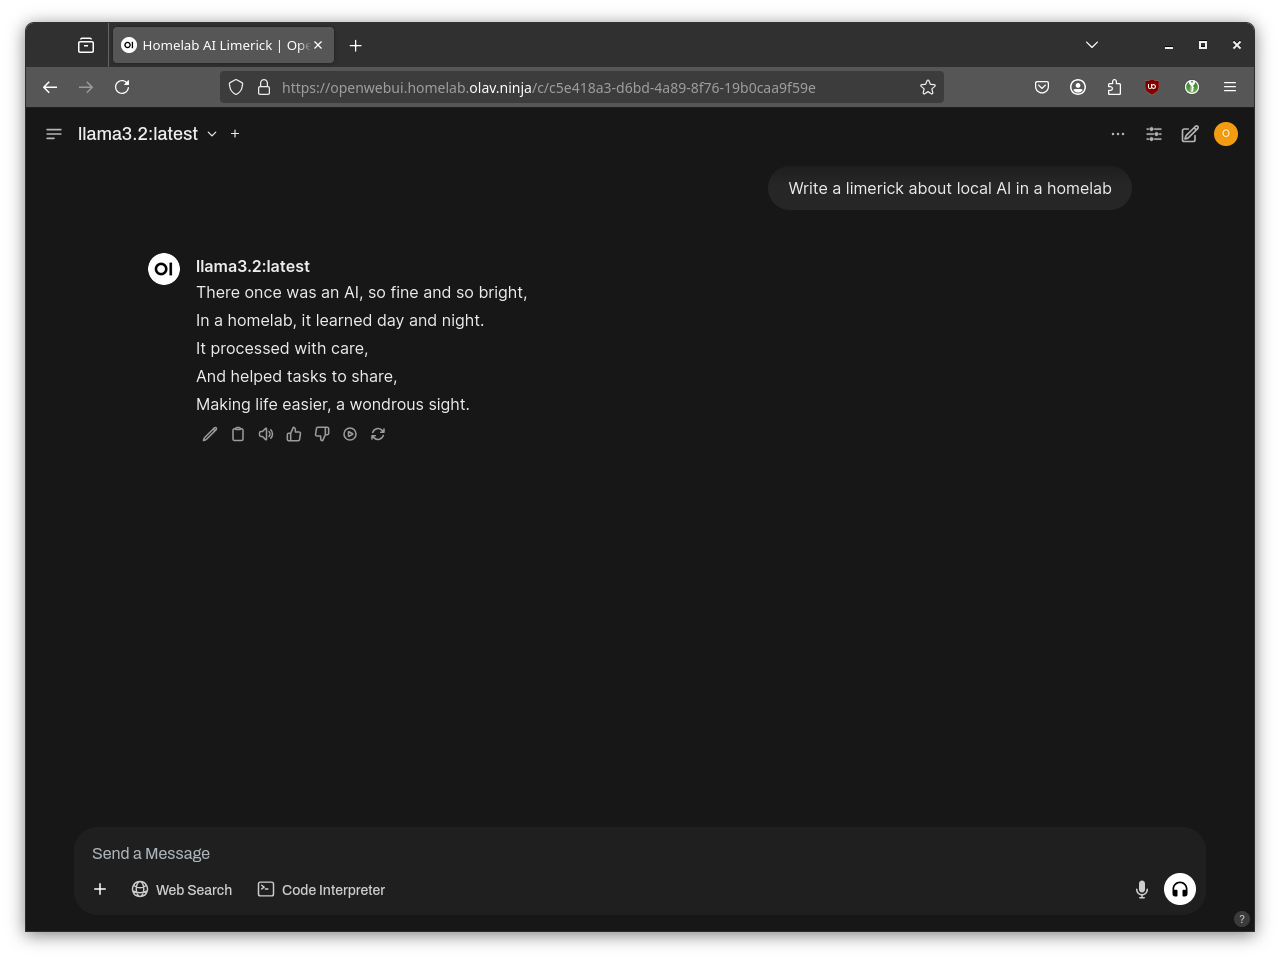
Installing Ollama and Open WebUI
With the GPU successfully passed through to the Talos VM and the ROCm device plugin making it available to Kubernetes, the final step was to deploy some software that could leverage the GPU for AI workloads. I chose to use Ollama, a lightweight framework designed for running large language models locally, paired with Open WebUI, which provides an intuitive user interface for interacting with the models.
For deployment, I utilized the official Helm charts for both applications, which made the installation process straightforward and maintainable. First, I created a kustomization for Ollama:
The crucial configuration here is enabling GPU support through ollama.gpu.enabled: true and specifically setting the GPU type to AMD. I also configured an ingress with TLS, using cert-manager to automatically obtain and renew a certificate from Let's Encrypt. The persistent volume configuration ensures that downloaded models are preserved across pod restarts, which is important for maintaining a stable environment without having to repeatedly download large model files.
Next, I installed Open WebUI, configuring it to connect to the Ollama service I had just deployed:
The Open WebUI configuration points to the Ollama service using Kubernetes DNS (ollama.ollama.svc.cluster.local), allowing communication between the two services to happen inside the cluster. Similar to the Ollama configuration, I set up an ingress with TLS for secure access and added an annotation to automatically obtain and renew a certificate from Let's Encrypt.
After applying these changes, I had a complete, functioning setup where Ollama uses the GPU to run large language models efficiently, while Open WebUI provided a user-friendly interface.
Conclusion
By repurposing my old GPU for AI inferencing I was able to enhance the capabilities of my Homelab without having to invest in new expensive hardware. This setup gives me the freedom to experiment with AI applications while maintaining complete control over my data and eliminating dependency on external cloud services, which aligns perfectly with the design principles of my Homelab!
While the performance of my old AMD Vega 56 may not match the latest GPUs and specialized AI accelerators, it offers more than enough computational power for personal projects, experimentation, and learning about AI systems. The entire setup also integrates seamlessly with my existing Kubernetes-based infrastructure, maintaining the declarative, infrastructure-as-code approach I use throughout my environment.
In the future, I plan to explore additional AI applications that can benefit from GPU acceleration within my Homelab, such as Stable Diffusion for image generation and speech recognition models for self-hosted voice assistants.